
Assistive Reading Device for Individuals with Dyslexia
Published on .
What is Dyslexia?
Dyslexia involves significant impairments related to reading comprehension, word recognition, and, in many cases, writing and spelling (American Psychiatric Associaiton, 2013 [DSM 5 315.00]). It is currently believed that dyslexia has neurological bases which lie in the areas of the brain associated with phonological awareness and processing (see Kring, Johnson, Davison, & Neale, 2014; Lightfoot, Cole, & Cole, 2013). With a prevalence rate of between five and 15% in the general population, dyslexia is the most common specific learning disorder (Kring et. al, 2014).
Project Goals
By speaking with individuals with dyslexia, I learned that text-to-speech (TTS) technologies can sometimes mitigate some of the difficulties associated with dyslexia. Thus, digital versions of texts that can be consumed with a screen reader are perferable to some individuals with dyslexia. However, there are times in which printed text is unavoidable. In these situations, there are several technological options available to individuals with dyslexia. Most prevalent among these options are devices that digitize printed text, making it available for TTS. These devices come in two varieties.
The first type of device typically resembles an oversized highlighter marker (e.g., the Iris Pen). These devices offer users flexibility in that they can digitize individual words and/or consecutive words. Because they cost upwards of $140 USD, though, scanner pens with TTS functionality may be prohibitively expensive for some individuals.
The other category of devices are essentially pocket-sized scanners that digitize an entire page at once. These devices are often more affordable than those in the former category, but they come with several limitations. For one, these scanners provide less flexibility to users. If a user is struggling with a single word, they must scan an entire passage just to hear that single word spoken back to them. Another limitation is that these devices are unable to provide direct TTS. Scans must be offloaded to a computer before TTS is available.
Both types of devices are likely to be quite conspicuous if used in public settings. As Shinohara and Wobbrock (2011) explain, beyond the functional utility provided by assistive technologies (AT), AT designers should be cognizent of the ways in which AT use may affect users’ social interactions with others in their shared environments. It is important to me that any AT I design be minimally conspicuous and as socially acceptable as possible, so as to avoid stigmatizing users. If users feel stigmatized, they are much less likely to use AT, even if it has the potential to help them. It is also important to me that AT I design be usable in educational settings. Both of the types of tools I describe above usually have on-board storage. Because of this, educators I spoke with voiced concerns about allowing students to use these tools in classes and, in particular, in test-taking settings. Thus, this project has two primary goals:
- Create an AT for individuals with dyslexia that both offers functional utility and supports users’ psychosocial wellbeing.
- Create an AT that educators are likely to allow students to use in classroom and test-taking settings.
My Design
At it’s core, my design is a finger-mounted camera assembly that wirelessly pairs with a smartphone or a computer. The design involves 4 key components: (1) image capture; (2) image stitching; (3) optical character recognition; and (4) text-to-speech processing.
Image Capture

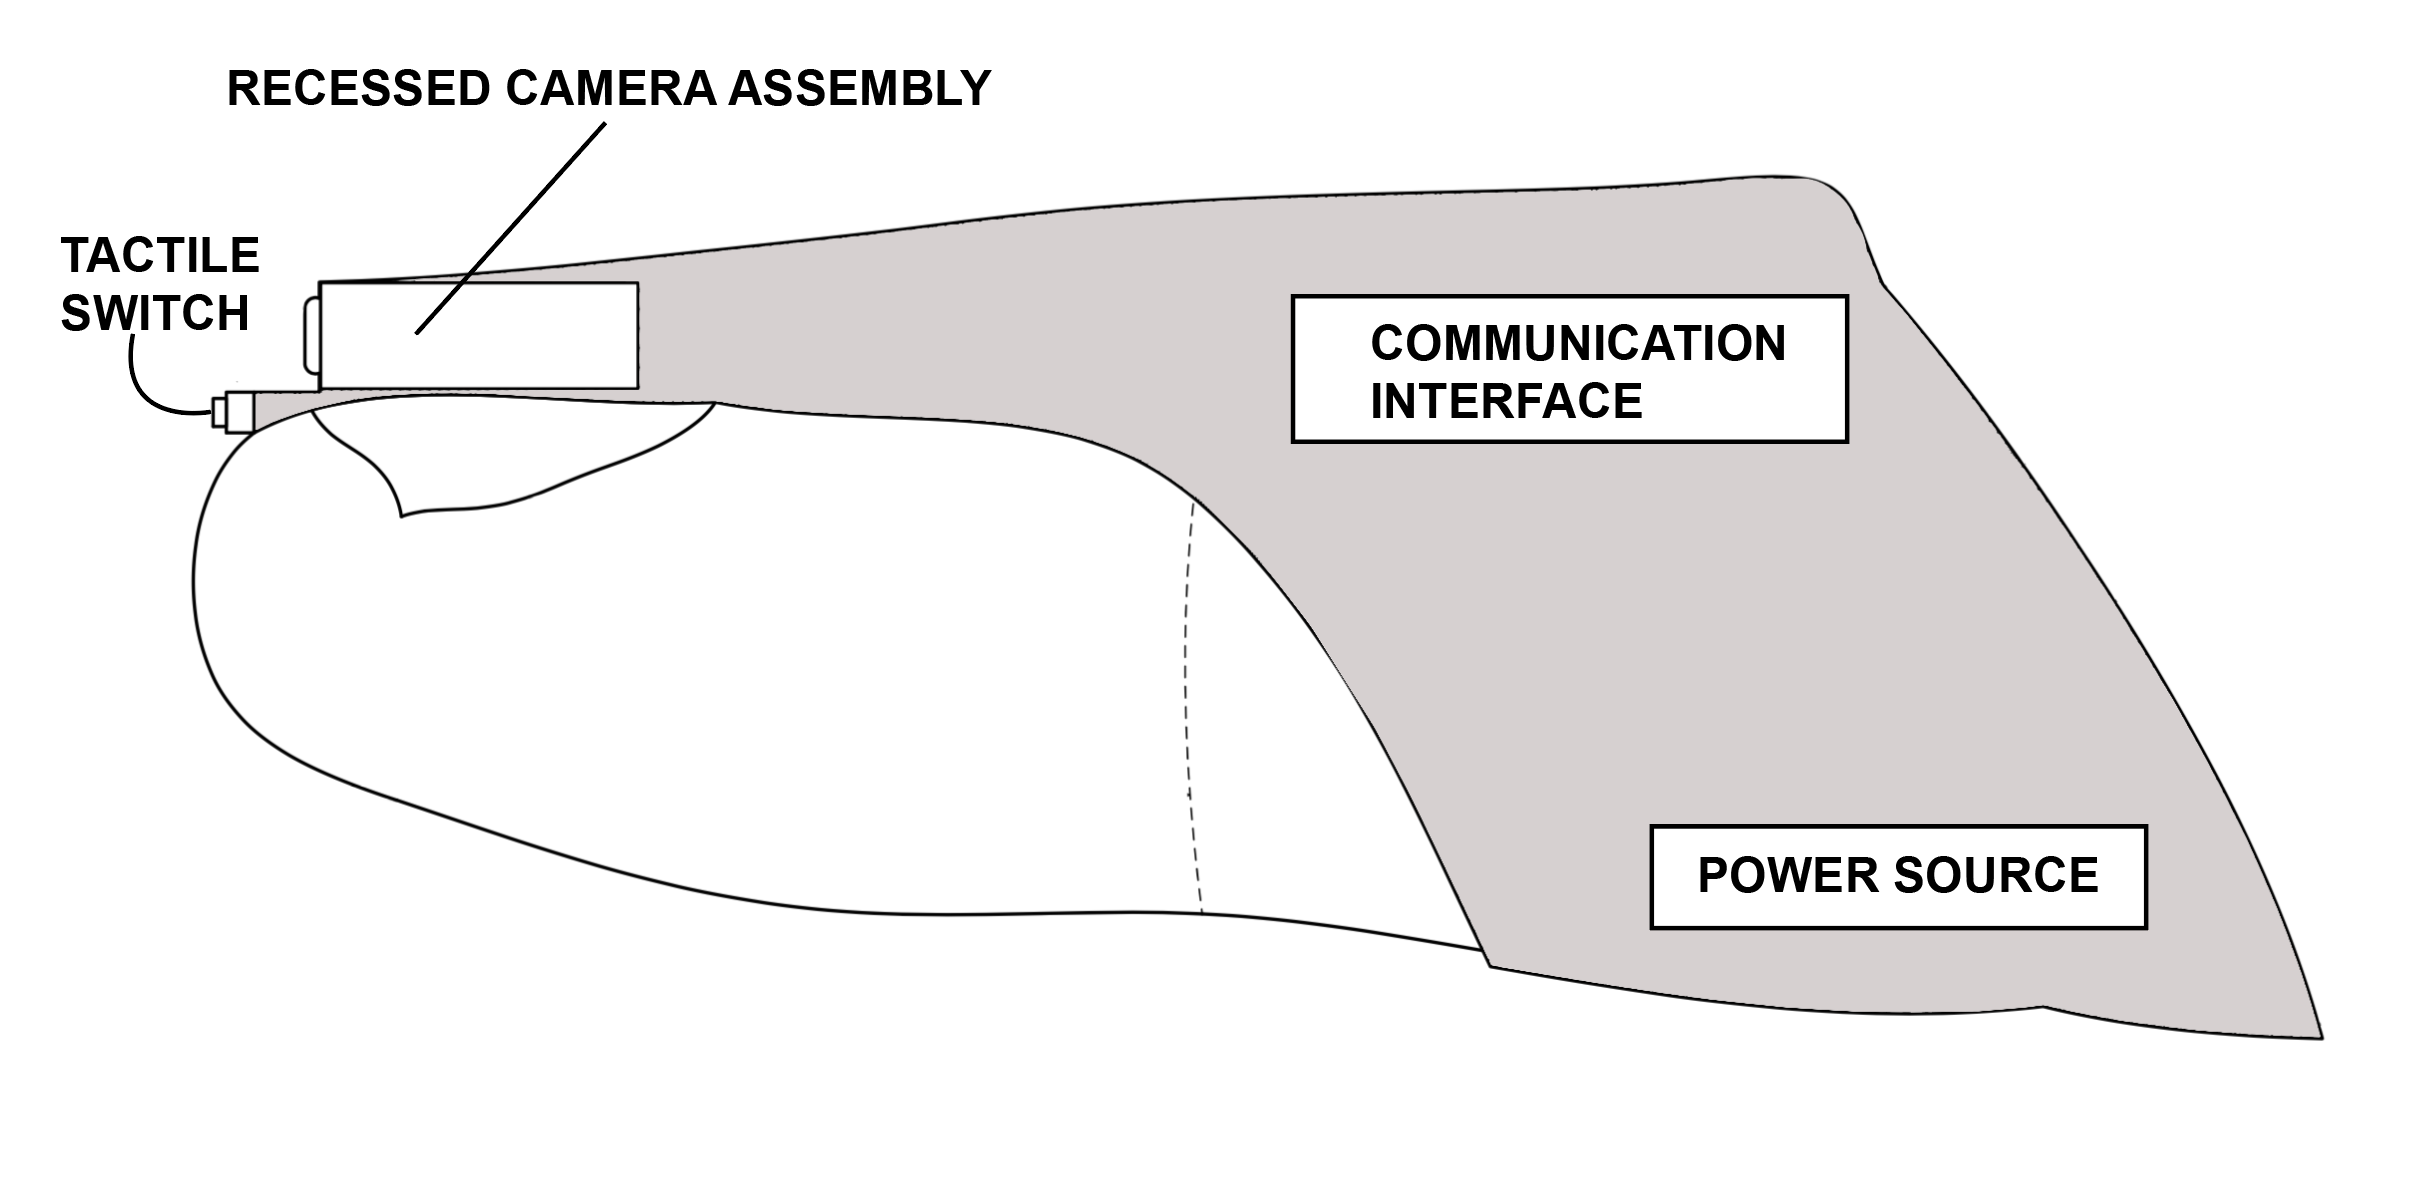
You’ll notice in Figure 1 that, over the tip of the user’s finger, there’s a depressible tactile switch. Image capture begins when the user’s finger makes contact with a surface, thereby depressing this button. Having initiated image capture, the user runs their finger underneath the word(s) they want spoken back to them, in the same motion that one would use if following text with one’s finger. Until the user lifts their finger such that the tactile switch is no longer engaged, the recessed camera mounted above and behind the switch (see Figure 1) will continuously take pictures. These pictures are transmitted wirelessly to a paired smartphone or computer.
Image Stitching
When the tactile switch disengages, the paired computing device begins processing the images. This process starts with “stitching” the many images captured in to a single image file. While I initially tested the feasibility of this step using SURF keypoint detection, my software will ultimately utilize ORB.
Optical Character Recognition
Having created a single image containing the totality of the text the user wishes to hear spoken back to them, the computing device will now extract the text from the image. This process is called optical character recognition (OCR). Specifically, I use Google’s Tesseract OCR engine. The extracted text is temporarily stored in the computing device’s main memory.
Text-To-Speech
Lastly, the extracted text is retrieved from memory and run through a text-to-speech (TTS) engine. This generates an .mp3 audio file which is then played for the user, thereby “speaking” the scanned words via a speaker or headphones. After the .mp3 file is played, both the .mp3 file and the cached text are deleted from storage and from memory, respectively. Thus, if used in an exam-taking scenerio, use of this device would not enable users to leave the classroom with saved exam questions. Presently, I use Google’s TTS engine, available through the Translate API. While being able to utilize the translation power of Google Translate is beneficial (I will explain the importance of this in a later section), using Google Translate for TTS necessitates an internet connection. In future iterations of my prototype, I will be experimenting with alternative TTS engines.
Other Design Details
In the video at the top of this page, the design is operationalized in my earliest prototype as an endoscopic USB CMOS camera taped to the index finger of a gardening glove. The camera is plugged into my Mac Book Pro, which runs a Python package I wrote to accomplish the four steps detailed above.
As pictured in Figure 1, I intend for future iterations to be slimmer and more aesthetically pleasing, so as to be less conspicuous. I am considering using either a non-porous material (for easy cleaning in the event that a single device is being shared within a special education department, for instance) and/or a fabric like Coolmax for users’ comfort.
Some folks at MIT’s Media Lab are already working on a finger-mounted device to aid individuals with vision impairments to consume printed text. I’m quite certain they have more resources and know-how to throw at this problem than I do at present, so I’m going to leave desigining for vision-impaired users to them, for now. That said, I intend to include several features that may prove to be beneficial to both my intended users (individuals with dyslexia) as well as individuals with vision impairments. One of the common complaints found in reviews of the digital highlighter devices (described above) is that it is difficult to properly align the highligher with the text. I’m considering projecting a laser bounding box from the device onto the page, so users are able to see exactly what is in the camera’s field-of-view and adjust their alignment accordingly. In theory, it looks like it might be possible to design the device such that it is able to decide whether or not it is properly aligned, utilizing both the laser bounding box and the camera (and probably some machine learning classifiers). If I’m able to achieve this type of automatic detection, I can provide haptic and/or auditory feedback to users, signaling whether they’ve properly lined up their finger with the text.
Rationale
As I mentioned earlier, it is important to me that any AT I design be socially acceptable. I don’t want users to be stigmatized for using an AT, or have AT use lead to uncomfortable social interactions. AT should provide functional utility and, in doing so, should enhance users’ feelings of autonomy and competence. So, I want to design something as inconspicuous as possible. While my prototype is clunky, my end-goal is to fit the device into a slim sleeve worn on one’s index finger. It communicates with smartphones, which are ubiqutous, and are, therefore, non-stigmatizing. Given the increasing prevalence of wireless earbuds and bluetooth headsets, it should not seem too unusual for users of my device to wear such an earpiece to hear the results of my system’s TTS processing. One of my favorite “features” that is intended to render this device as inconspicuous as possible is the incorporation of Google’s Translate API. By capitalizing on this API’s translation capabilities, my device has dual functions: (1) an assistive technology for individuals with dyslexia and; (2) a pocket translator. Suppose you are learning a new language and immersing yourself in a book written in this new language. Imagine, rather than having to pause every time you need to double-check the meaning of a word, you just point at it to hear the word translated into your native language (or vice versa)! My hope is that this system will be used for both purposes. If the device is associated with translation, rather than with disability, users with dyslexia may effectively “blend in” when using this tool.
I chose this form factor not only because it is potentially inconspicuous, but also because reading with one’s finger is a natural interaction. When kids are learning to read, typically they are instructed to follow along underneath the words with their finger. It also means that users recieve tactile feedback directly from the page as they use their fingers, which may prove to be more engaging and more natural feeling than using a bulky digital highlighter (actual testing is needed to determine whether this is the case).
Because dyslexia is known to adversely impact individuals’ performance in school and their overall academic outcomes, I want this system to be usable in classrooms. In response to the feedback of educators, I’ve written my software in such a way that no scanned materials are ever stored.
What’s Next?
While my device was built based on input from several individuals with dyslexia and from several educators, it remains untested. Funding permitting, I’d like to create a slightly more advanced prototype and begin running a user-experience study. I’d like to incorporate participatory design into this study to the greatest extent possible, including individuals with dyslexia in both the design and the testing processes.
Contributors
This device was worked on as part of a class at the Illinois Institute of Technology (Illinois Tech). Because I worked on this system in my capacity as a student, Illinois Tech makes no claims of ownership. Nominally (student engagement is hard to come by in summer classes), several classmates worked on a group project with me, the focus of which was this device. While this page details only my contributions to this project (as well as much of the work I did before and after the project), I’d like to name my team members.
Josh Guberman
That’s me! I came up with the idea for this device as I was replacing the infrared sensor in my television. I had the new sensor on my fingertip and thought it would be cool if I could actually sense infrared light with my finger. At the time, one of my fellow research assistants at CASM Lab had been working with Tesseract OCR for an unrelated project involving an Instagram scraper. Free-association is a marvelous thing - I ended up wondering whether I could use OCR to read text with my finger. I drafted the prototype and then pitched the idea to my group members. I built the prototype using supplies from Ace Hardware and Amazon. I wrote the software in Python. I tested the device, created the demonstration video for our group (featured at the top of this page), and created the poster we used for our group’s presentation. All design changes in figure 1 not reflected in the demo video were made by me, after the conclusion of the class. You can look at our group’s poster here. All of the work discussed on this page was done by me and all citations used on this page and in the demo video were discovered through my review of the relevant literature.
Patrick Gale
Patrick was a mechanical engineering major. After I had built the prototype (shown here), he drafted it in AutoCAD. Patrick’s drawing can be seen here.
Thomas Barker
Thomas, a business major, provided insights into how we could best market this device. I want it to be as inexpensive as possible so as to be widely available to everyone who can benefit from it, so we butted heads a bit (I’m bad at capitalism).
Yoftahel Gebre
Yoftahel, a biomechanical engineering major, made pamphlets we handed out during our poster presentation.